camera identify
Try for Free
tab list
PictureThis
English
arrow
English
繁體中文
日本語
Español
Français
Deutsch
Pусский
Português
Italiano
한국어
Nederlands
العربية
Svenska
Polskie
ภาษาไทย
Bahasa Melayu
Bahasa Indonesia
PictureThis
Search
Search Plants
Try for Free
Global
English
English
繁體中文
日本語
Español
Français
Deutsch
Pусский
Português
Italiano
한국어
Nederlands
العربية
Svenska
Polskie
ภาษาไทย
Bahasa Melayu
Bahasa Indonesia
This page looks better in the app
picturethis icon
Instantly identify plants with a snap
Snap a photo for instant plant ID, gaining quick insights on disease prevention, treatment, toxicity, care, uses, and symbolism, etc.
Download the App for Free
Continue Reading
about about
About
care_guide care_guide
Care Guide
topic topic
Care FAQ
plant_info plant_info
More Info
pests pests
Pests & Diseases
distribution_map distribution_map
Distribution
care_scenes care_scenes
More About How-Tos
pic top
Jerusalem spurge
Jerusalem spurge
Jerusalem spurge
Euphorbia hierosolymitana
Planting Time
Planting Time
Spring, Summer, Fall
care guide

Care Guide for Jerusalem spurge

feedback
Feedback
feedback
Watering Care
Watering Care
Details on Watering Care Watering Care
Fertilizing Care
Fertilizing Care
Details on Fertilizing Care Fertilizing Care
Pruning
Pruning
Deadhead (or remove) withered flowers after flowering.
Details on Pruning Pruning
Soil Care
Soil Care
Loam
Details on Soil Care Soil Care
Ideal Lighting
Ideal Lighting
Full sun, Partial sun
Details on Sunlight Requirements Ideal Lighting
care guide bg
Know the light your plants really get.
Find the best spots for them to optimize their health, simply using your phone.
Download the App
Picture This
A Botanist in Your Pocket
qrcode
Scan QR code to download
label
cover
Jerusalem spurge
Sunlight
Sunlight
Full sun
Hardiness Zones
Hardiness Zones
2 to 13
Planting Time
Planting Time
Spring, Summer, Fall
question

Questions About Jerusalem spurge

feedback
Feedback
feedback
Watering Watering Watering
Pruning Pruning Pruning
Sunlight Sunlight Sunlight
Fertilizing Fertilizing Fertilizing
What is the best way to water my Jerusalem spurge?
Your Jerusalem spurge will not be too picky about how you choose to water it. As such, you can use just about any common watering tool to moisten this plant’s soil. Watering cans, hoses, and even cups will work just fine when it is time to water your Jerusalem spurge. Regardless of which watering tool you use, you should typically apply the water directly to the soil. In doing so, you should ensure that you moisten all soil areas equally to give all parts of the root system the water it needs. It can help to use filtered water, as tap water can contain particles that are harmful to plants. It is also beneficial to use water that is at or slightly above room temperature, as colder or hotter water can be somewhat shocking to the Jerusalem spurge. However, the Jerusalem spurge usually responds well to any kind of water you give it.
Read More more
What should I do if I water my Jerusalem spurge too much or too little?
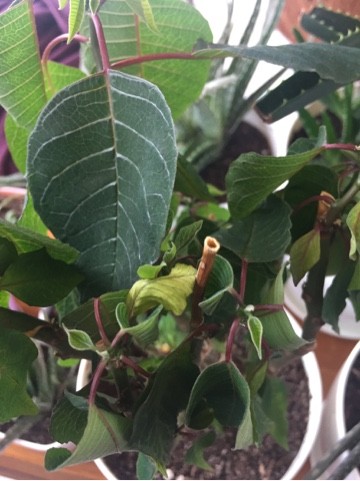
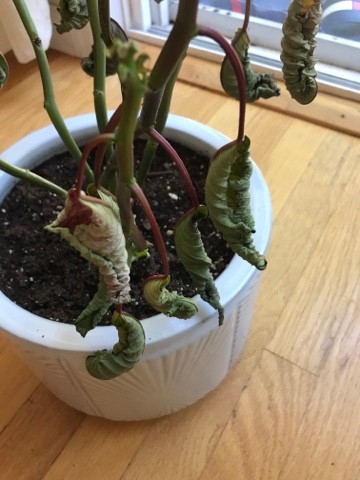
For outdoor plants, especially newly planted plants or plant seedlings, they can be prone to lack of watering. Remember that you need to keep watering enough for a few months when the tree is small or just planted. This is because once the roots are established, Jerusalem spurge can rely on rain most of the time. When your Jerusalem spurge is planted in pots, overwatering is often more likely to.When you accidentally overwater your Jerusalem spurge, you should be prepared to remedy the situation immediately. First, you should stop watering your plant right away to minimize the effect of your overwatering. After, you should consider removing your Jerusalem spurge from its pot to inspect its roots. If you find that none of the roots have developed root rot, it may be permissible to return your plant to its container. If you do discover signs of root rot, then you should trim away any roots that have been affected. You may also want to apply a fungicide to prevent further damage. Lastly, you should repot your Jerusalem spurge in soil that is well-draining. In the case of an underwatered Jerusalem spurge, simply water this plant more frequently. Underwatering is often an easy fix. If you underwater, the plant's leaves will tend to droop and dry out and fall off, and the leaves will quickly return to fullness after sufficient watering. Please correct your watering frequency as soon as underwatering occurs.
Read More more
How often should I water my Jerusalem spurge?
Most plants that grow naturally outdoors can be allowed to grow normally with rainfall. If your area lacks rainfall, consider giving your plants adequate watering every 2 weeks during the spring and fall. More frequent watering is needed in summer. In winter, when growth becomes slower and plants need less water, water more sparingly. Throughout the winter, you may not give it additional watering at all. If your Jerusalem spurge is young or newly planted, then you should water more frequently to help it establish, and mature and grow up to have more adaptable and drought tolerant plants. For potted plants, there are two main ways that you can determine how often to water your Jerusalem spurge. The first way is to set a predetermined watering schedule. If you choose this route, you should plan to water this plant about once every week or once every other week. However, this approach may not always work as it does not consider the unique conditions of the growing environment for your Jerusalem spurge . Your watering frequency can also change depending on the season. For instance, a predetermined watering schedule will likely not suffice during summer when this plant's water needs are highest. An alternative route is to set your watering frequency based on soil moisture. Typically, it is best to wait until the first two to four inches of soil, usually ⅓ to ½ depth of the pots, have dried out entirely before you give more water.
Read More more
How much water does my Jerusalem spurge need?
When it comes time to water your Jerusalem spurge, you may be surprised to find that this plant does not always need a high volume of water. Instead, if only a few inches of soil have dried since your last watering, you can support healthy growth in the Jerusalem spurge by giving it about five to ten ounces of water every time you water. You can also decide your water volume based on soil moisture. As mentioned above, you should note how many inches of soil have dried out between waterings. A surefire way to make sure your Jerusalem spurge gets the moisture it needs is to supply enough water to moisten all the soil layers that became dry since the last time you watered. If more than half of the soil has become dry, you should consider giving more water than usual. In those cases, continue adding water until you see excess water draining from your pot’s drainage holes. If your Jerusalem spurge is planted in an area that gets plenty of rain outdoors, it may not need additional watering. When the Jerusalem spurge is young or just getting established, make sure it gets 1-2 inches of rain per week. As it continues to grow and establish, it can survive entirely on rainwater and only when the weather is hot and there is no rainfall at all for 2-3 weeks, then consider giving your Jerusalem spurge a full watering to prevent them from suffering stress.
Read More more
How can I tell if i'm watering my Jerusalem spurge enough?
Overwatering is a far more common problem for the Jerusalem spurge, and there are several signs you should look for when this occurs. Generally, an overwatered Jerusalem spurge will have yellowing leaves and may even drop some leaves. Also, overwatering can cause the overall structure of your plant to shrivel and may also promote root rot. On the other hand, an underwatered Jerusalem spurge will also begin to wilt. It may also display leaves that are brown or brittle to the touch. Whether you see signs of overwatering or underwatering, you should be prepared to intervene and restore the health of your Jerusalem spurge.
Read More more
How can I water my Jerusalem spurge at different growth stages?
When the Jerusalem spurge is very young, such as when it is in a seedling stage, you will need to give it more water than you would if it were at a mature age. During the early stages of this plant’s life, it is important to keep the soil consistently moist to encourage root development. The same is true for any Jerusalem spurge that you have transplanted to a new growing location. Also, the Jerusalem spurge can develop showy flowers and fruits when you give them the correct care. If your Jerusalem spurge is in a flowering or fruiting phase, you will likely need to give a bit more water than you usually would to support these plant structures.
Read More more
How can I water my Jerusalem spurge through the seasons?
The seasonal changes will affect how often you water your Jerusalem spurge. Mainly, during the hottest summer months, you will likely need to increase how much you water this plant, especially if it grows in an area that receives ample sunlight. Strong summer sunlight can cause soil to dry out much faster than usual, meaning that you’ll need to water more frequently. By contrast, your Jerusalem spurge will need much less water during the winter, as it will not be in an active growing phase. During winter, you can get by with watering once every 2 to 3 weeks or sometimes not at all. For those growing this plant indoors, you should be somewhat wary of appliances such as air conditioners, which can cause your plant to dry out more quickly, which also calls for more frequent watering.
Read More more
What's the difference between watering my Jerusalem spurge indoors vs outdoors?
In some cases, your Jerusalem spurge may not need any supplemental watering when it grows outside and will survive on rainwater alone. However, if you live in an area of little to no rain, you should water this plant about every two weeks. If you belong to the group of people who live out of this plant's natural hardiness zone, you should grow it indoors. In an indoor setting, you should monitor your plant's soil as it can dry out more quickly when it is in a container or when it is exposed to HVAC units such as air conditioners. Those drying factors will lead you to water this plant a bit more often than if you grew it outdoors.
Read More more
icon
Get tips and tricks for your plants.
Keep your plants happy and healthy with our guide to watering, lighting, feeding and more.
close
plant_info

Key Facts About Jerusalem spurge

feedback
Feedback
feedback

Attributes of Jerusalem spurge

Lifespan
Perennial
Plant Type
Shrub
Plant Height
20 cm
Leaf Color
Green
Flower Color
Yellow
Green
Leaf type
Evergreen
Ideal Temperature
0 - 41 ℃

Scientific Classification of Jerusalem spurge

icon
Find your perfect green friends.
Plan your green oasis based on your criteria: plant type, pet safety, skill level, sites, and more.
pests

Common Pests & Diseases About Jerusalem spurge

feedback
Feedback
feedback
Common issues for Jerusalem spurge based on 10 million real cases
icon
Treat and prevent plant diseases.
AI-powered plant doctor helps you diagnose plant problems in seconds.
Yellow edges
Yellow edges, a plant disease affecting Jerusalem spurge, manifests as yellowing along leaf margins, progressing to broader chlorosis. The disease impacts photosynthesis and general vitality, often leading to stunted growth and premature leaf drop.
Scars
Scars Scars
Scars
Any light-colored markings that appear on stems but which do not enlarge or multiply are simply scars that have healed.
Solutions: Each source of scarring requires a different approach to help your plant recover. Protect the trunk and leaves from physical damage like scrapes. If pests or disease are the cause of scarring, isolate the plant from others to avoid further spread. Some pests can be removed with organic remedies such as a soft cloth and soapy water solution or diluted isopropyl alcohol spray. Stop sunburn by moving your plant away from direct sunlight and making sure it has the water it needs. Frequent leaf or bud loss may be due to insufficient light or nutrients.
Brown spot
Brown spot Brown spot
Brown spot
This infection can cause brown spots or patches to appear on the plant.
Solutions: In minor cases of brown spot, there isn’t any need to treat the disease. However, if much of the foliage is affected and defoliation occurs, the plant will benefit from getting rid of the infection. It is recommended to start by applying organic treatment options, working up to the more potent synthetic, chemical fungicides if necessary. Organic options won’t kill the fungus, but will prevent it from spreading. Dissolve ½ teaspoon of baking soda and one teaspoon of liquid soap in a gallon of water. Using a spray bottle, spray on tops and bottoms of leaves until the mixture drips off. Repeat every two weeks until existing spots stop enlarging and new spots no longer appear. Spray a copper-based fungicidal soap on the leaves, coating the top and bottom leaf surfaces. Reapply as directed on the product label. Copper penetrates the leaf surface and prevents germination of spores so the fungus cannot spread. Apply an all-purpose fungicide to the entire plant, following the label instructions carefully.
Underwatering
Underwatering Underwatering
Underwatering
Leaves may wilt for a variety of reasons.
Solutions: The easiest (and most obvious) way to address underwatering is to fully hydrate the plant. However, this must be done carefully. A common mistake that many gardeners make is to douse their underwatered plants with water. This can overwhelm the roots of the plant and shock its system, something that can be even more damaging than the lack of water to begin with. Instead, water thoroughly and slowly, taking breaks to let the water slowly saturate through the soil to get to the roots. Use room temperature water, as cold water might be too much of a shock. In the future, shorten the time between waterings. A good rule of thumb is to check the soil around each plant daily. If it’s dry to at least two inches down, it’s time to water. If a container plant is repeatedly drying out very quickly, repotting into a slower-draining container might be a good idea, too.
close
plant poor
Yellow edges
Overview
Symptom
Causes
Treatment
Prevention
Active Period
What is Yellow edges Disease on Jerusalem spurge?
Yellow edges, a plant disease affecting Jerusalem spurge, manifests as yellowing along leaf margins, progressing to broader chlorosis. The disease impacts photosynthesis and general vitality, often leading to stunted growth and premature leaf drop.
Symptom Analysis
Symptom Analysis
In Jerusalem spurge, the primary manifestation includes yellowing at the margins of the leaves, ultimately affecting almost the entire leaf surface. This often correlates with reduced growth and vigor, leading to premature leaf senescence.
What Causes Yellow edges Disease on Jerusalem spurge?
1
Nutrient deficiency
Imbalances or lack of essential nutrients such as magnesium or iron can lead to yellowing of leaf edges.
2
Watering issues
Both underwatering and overwatering can contribute to stress, leading to yellow edges.
3
Environmental stress
Extreme temperatures, poor soil conditions, or inadequate light may exacerbate the condition.
How to Treat Yellow edges Disease on Jerusalem spurge?
1
Non pesticide
Proper fertilization: Apply balanced fertilizers that contain essential micronutrients to correct nutritional deficiencies.

Optimized watering: Maintain consistent moisture levels, avoiding both over and under-watering.
2
Pesticide
Foliar sprays: Use foliar sprays containing chelated forms of necessary micronutrients for quick absorption and symptom management.
Continue reading in our app - it's better
A database of 400000+ plants and unlimited guides at your fingertips...
qrcode
Scan the QR code with your phone camera to download the app
Scars
plant poor
Scars
Any light-colored markings that appear on stems but which do not enlarge or multiply are simply scars that have healed.
Symptom Analysis
Symptom Analysis
Scars form when the plant repairs wounds. They can be the result of people or pets passing by and scraping the plant. Once the underlying issue is resolved, the plant will heal but a scar may remain.
Pests and pathogens can also cause scarring. Insects may attack the plant for a meal, resulting in extensive scarring when a few invaders turn into an infestation. Diseases such as fungus and bacteria can weaken the plant, causing brown spots, mushy areas, or blisters that lead to scars.
Scars occur on stems when a leaf or bud has been lost and the plant has healed. The harder tissue is like a scab that protects a wound.
On other occasions, scars can signal problems from environmental conditions, such as overexposure to sunlight or heat. It might surprise you to know that plants can suffer from sunburn, even desert dwellers like cactus!
Solutions
Solutions
Each source of scarring requires a different approach to help your plant recover.
  1. Protect the trunk and leaves from physical damage like scrapes.
  2. If pests or disease are the cause of scarring, isolate the plant from others to avoid further spread. Some pests can be removed with organic remedies such as a soft cloth and soapy water solution or diluted isopropyl alcohol spray.
  3. Stop sunburn by moving your plant away from direct sunlight and making sure it has the water it needs.
  4. Frequent leaf or bud loss may be due to insufficient light or nutrients.
Prevention
Prevention
Preventing some sources of scarring is easier than others, but all start with careful attention to your plants once you decide to bring them home.
  1. Review specific guidelines for your plant, including soil drainage, watering, and fertilizer requirements.
  2. Inspect plants before planting and use sterile pots and fresh potting soil or media to limit transfer of fungi or bacteria.
  3. Once established, check your plants regularly for signs of scarring or the presence of pests, as it is better to catch problems as early as possible.
Continue reading in our app - it's better
A database of 400000+ plants and unlimited guides at your fingertips...
qrcode
Scan the QR code with your phone camera to download the app
Brown spot
plant poor
Brown spot
This infection can cause brown spots or patches to appear on the plant.
Overview
Overview
Discolored spots on the foliage of plants are one of the most common disease problems people observe. These spots are caused by fungal and bacterial diseases, with most infections related to a fungal pathogen.
Brown spot can occurs on all houseplants, flowering ornamentals, vegetable plants, and leaves of trees, bushes, and shrubs. No plants are resistant to it, and the problem is worse in warm, wet environments. It can occur at any point in the life stage as long as leaves are present.
Small brownish spots appear on the foliage and enlarge as the disease progresses. In severe cases, the plant or tree is weakened when the lesions interrupt photosynthesis or cause defoliation.
Symptom Analysis
Symptom Analysis
In most cases, brown spot only affects a small percentage of the whole plant, appearing on a small amount of the leaves. A small infection only puts minor stress on the plant. However, if left untreated and the disease progresses over numerous seasons, it will severely impact the health and productivity of the infected specimen.
  • Sporulation begins (reproduction of the fungal spores), and tiny spots appear on leaves.
  • Placement is often random and scattered as diseases are spread through raindrops.
  • May appear on lower leaves and the interior of the plant where humidity is higher.
  • Brown spots enlarge and grow large enough to touch neighboring spots to form a more prominent blotch.
  • Leaf margins may turn yellow.
  • Tiny black dots (fruiting bodies of the fungi) appear in the dead spots.
  • Blotches grow in size until the entire leaf is brown.
  • The leaf falls off the plant.
Severe Symptoms
  • Partial or complete premature defoliation
  • Reduced growth
  • Increased susceptibility to pests and other diseases
Disease Cause
Disease Cause
Brown spot, or leaf spot, is a common descriptive term given to several diseases affecting the leaves of plants and trees. Around 85% of diseases exhibiting leaf spots are due to fungus or fungus-like organisms. Sometimes brown spot is caused by a bacterial infection, or insect activity with similar symptoms.
When conditions are warm and the leaf surfaces are wet, fungal spores being transported by wind or rain land on the surface and cling to it. They do not rupture the cell walls but grow in the space between the plant plasma membrane and the plant cell wall. As the spores reproduce, they release toxins and enzymes that cause necrotic spots (i.e., dead tissue) on the leaves, allowing the fungi to consume the products released when the cells degrade.
Continue reading in our app - it's better
A database of 400000+ plants and unlimited guides at your fingertips...
qrcode
Scan the QR code with your phone camera to download the app
Underwatering
plant poor
Underwatering
Leaves may wilt for a variety of reasons.
Overview
Overview
Underwatering plants is one of the quickest ways to kill them. This is something that most gardeners are well aware of. Unfortunately, knowing exactly how much water a plant needs can be tricky, especially considering that underwatering and overwatering present similar symptoms in plants.
Therefore, it’s important to be vigilant and attentive to each plants’ individual needs.
Symptom Analysis
Symptom Analysis
As mentioned earlier, overwatering and underwatering present similar symptoms in plants. These symptoms include poor growth, wilted leaves, defoliation, and brown leaf tips or margins. Ultimately, both underwatering and overwatering can lead to the death of a plant.
The easiest way to determine whether a plant has too much water or too little is to look at the leaves. If underwatering is the culprit, the leaves will look brown and crunchy, while if it’s overwatering, they will appear yellow or a pale green in color.
When this issue first begins, there may be no noticeable symptoms at all, particularly in hardy or drought-tolerant plants. However, they will begin to wilt once they start suffering from a lack of water. The edges of the plant’s leaves will become brown or curled. Soil pulling away from the edges of the planter is a telltale sign, or a crispy, brittle stem.
Prolonged underwatering can cause a plant’s growth to become stunted. The leaves might drop and the plant can be more susceptible to pest infestations, too.
Disease Cause
Disease Cause
Underwatering is caused by, quite simply, not watering plants often or deeply enough. There is a heightened risk of underwatering if any of these situations apply:
  • Extreme heat and dry weather (when growing outdoors)
  • Grow lights or indoor lighting that is too bright or intense for the type of plant
  • Using fast-draining growing media such as sand
Continue reading in our app - it's better
A database of 400000+ plants and unlimited guides at your fingertips...
qrcode
Scan the QR code with your phone camera to download the app
distribution

Distribution of Jerusalem spurge

feedback
Feedback
feedback

Habitat of Jerusalem spurge

Mountains, rocky
Northern Hemisphere
South Hemisphere

Distribution Map of Jerusalem spurge

distribution map
Native
Cultivated
Invasive
Potentially invasive
Exotic
No species reported
habit
care_scenes

More Info on Jerusalem Spurge Growth and Care

feedback
Feedback
Basic Care Guide
Common Pests & Diseases
Transplant
15-18 inches (38-45 cm)
For jerusalem spurge, the pinnacle time to nestle them into new homes spans from the heart of spring until the threshold of early summer, ensuring robust growth. Opt for bright locales with well-drained soil to welcome these perennials. Keep the tone amiable, steering clear of intensive procedures when transferring them.
Transplant Techniques
Pruning
Winter
Known for its versatility in dry climates, jerusalem spurge thrives with minimal care. To encourage healthy growth, prune dead or damaged stems in winter, when the plant is dormant. Remove up to one-third of the top growth to maintain shape and promote air circulation, which deters pests and diseases. Sterilize tools before use to prevent infection, and handle jerusalem spurge with care to avoid its toxic sap, which can cause skin irritation.
Pruning techniques
Propagation
Spring,Summer
Jerusalem spurge is adept at propagating from cuttings. Gardeners should select healthy, non-flowering stems for the best result, ensuring each cutting is about 4-6 inches long. Carefully snip just below a leaf node, as this area contains high concentrations of growth-promoting hormones beneficial for root development. Dipping the base of each cutting in a rooting hormone before planting into a well-draining soil mix can enhance rooting success. Maintaining moisture without waterlogging is crucial for the establishment of roots.
Propagation Techniques
Yellow edges
Yellow edges, a plant disease affecting Jerusalem spurge, manifests as yellowing along leaf margins, progressing to broader chlorosis. The disease impacts photosynthesis and general vitality, often leading to stunted growth and premature leaf drop.
Read More
Leaf yellowing
Leaf yellowing is a common affliction in Jerusalem spurge, characterized by a progressive discoloration that impairs photosynthesis and plant vigor. It may lead to stunted growth and, in severe cases, plant death.
Read More
Leaf tip withering
Leaf tip withering is a fungal disease primarily affecting Jerusalem spurge, leading to dessication and potential defoliation. If untreated, the disease can significantly impair photosynthesis and overall plant vitality.
Read More
Dark blotch
Dark blotch is a fungal disease affecting Jerusalem spurge, characterized by discolored patches on leaves and stems, potentially leading to plant decline and death if untreated.
Read More
close
product icon
Continue reading in our app - it's better
A database of 400000+ plants and unlimited guides at your fingertips...
Your Ultimate Guide to Plants
Identify grow and nurture the better way!
product icon
17,000 local species +400,000 global species studied
product icon
Nearly 5 years of research
product icon
80+ scholars in botany and gardening
ad
ad
Botanist in your pocket
Scan the QR code with your phone camera to download the app
About
Care Guide
Care FAQ
More Info
Pests & Diseases
Distribution
More About How-Tos
Jerusalem spurge
Jerusalem spurge
Jerusalem spurge
Euphorbia hierosolymitana
Planting Time
Planting Time
Spring, Summer, Fall
icon
Instantly identify plants with a snap
Snap a photo for instant plant ID, gaining quick insights on disease prevention, treatment, toxicity, care, uses, and symbolism, etc.
Download the App for Free
care guide

Care Guide for Jerusalem spurge

feedback
Feedback
feedback
icon
Know the light your plants really get.
Find the best spots for them to optimize their health, simply using your phone.
Download the App for Free
close
bg bg
download btn
Download
question

Questions About Jerusalem spurge

feedback
Feedback
feedback
Watering Watering Watering
Pruning Pruning Pruning
Sunlight Sunlight Sunlight
Fertilizing Fertilizing Fertilizing
What is the best way to water my Jerusalem spurge?
more
What should I do if I water my Jerusalem spurge too much or too little?
more
How often should I water my Jerusalem spurge?
more
How much water does my Jerusalem spurge need?
more
How can I tell if i'm watering my Jerusalem spurge enough?
more
How can I water my Jerusalem spurge at different growth stages?
more
How can I water my Jerusalem spurge through the seasons?
more
What's the difference between watering my Jerusalem spurge indoors vs outdoors?
more
icon
Get tips and tricks for your plants.
Keep your plants happy and healthy with our guide to watering, lighting, feeding and more.
Download the App for Free
close
plant_info

Key Facts About Jerusalem spurge

feedback
Feedback
feedback

Attributes of Jerusalem spurge

Lifespan
Perennial
Plant Type
Shrub
Plant Height
20 cm
Leaf Color
Green
Flower Color
Yellow
Green
Leaf type
Evergreen
Ideal Temperature
0 - 41 ℃
icon
Gain more valuable plant knowledge
Explore a rich botanical encyclopedia for deeper insights
Download the App for Free

Scientific Classification of Jerusalem spurge

icon
Never miss a care task again!
Plant care made easier than ever with our tailor-made smart care reminder.
Download the App for Free
pests

Common Pests & Diseases About Jerusalem spurge

feedback
Feedback
feedback
Common issues for Jerusalem spurge based on 10 million real cases
icon
Plant disease auto-diagnose & prevention
AI-powered plant doctor helps you diagnose plant problems in seconds.
Download the App for Free
Yellow edges
Yellow edges, a plant disease affecting Jerusalem spurge, manifests as yellowing along leaf margins, progressing to broader chlorosis. The disease impacts photosynthesis and general vitality, often leading to stunted growth and premature leaf drop.
Learn More About the Yellow edges more
Scars
Scars Scars Scars
Any light-colored markings that appear on stems but which do not enlarge or multiply are simply scars that have healed.
Solutions: Each source of scarring requires a different approach to help your plant recover. Protect the trunk and leaves from physical damage like scrapes. If pests or disease are the cause of scarring, isolate the plant from others to avoid further spread. Some pests can be removed with organic remedies such as a soft cloth and soapy water solution or diluted isopropyl alcohol spray. Stop sunburn by moving your plant away from direct sunlight and making sure it has the water it needs. Frequent leaf or bud loss may be due to insufficient light or nutrients.
Learn More About the Scars more
Brown spot
Brown spot Brown spot Brown spot
This infection can cause brown spots or patches to appear on the plant.
Solutions: In minor cases of brown spot, there isn’t any need to treat the disease. However, if much of the foliage is affected and defoliation occurs, the plant will benefit from getting rid of the infection. It is recommended to start by applying organic treatment options, working up to the more potent synthetic, chemical fungicides if necessary. Organic options won’t kill the fungus, but will prevent it from spreading. Dissolve ½ teaspoon of baking soda and one teaspoon of liquid soap in a gallon of water. Using a spray bottle, spray on tops and bottoms of leaves until the mixture drips off. Repeat every two weeks until existing spots stop enlarging and new spots no longer appear. Spray a copper-based fungicidal soap on the leaves, coating the top and bottom leaf surfaces. Reapply as directed on the product label. Copper penetrates the leaf surface and prevents germination of spores so the fungus cannot spread. Apply an all-purpose fungicide to the entire plant, following the label instructions carefully.
Learn More About the Brown spot more
Underwatering
Underwatering Underwatering Underwatering
Leaves may wilt for a variety of reasons.
Solutions: The easiest (and most obvious) way to address underwatering is to fully hydrate the plant. However, this must be done carefully. A common mistake that many gardeners make is to douse their underwatered plants with water. This can overwhelm the roots of the plant and shock its system, something that can be even more damaging than the lack of water to begin with. Instead, water thoroughly and slowly, taking breaks to let the water slowly saturate through the soil to get to the roots. Use room temperature water, as cold water might be too much of a shock. In the future, shorten the time between waterings. A good rule of thumb is to check the soil around each plant daily. If it’s dry to at least two inches down, it’s time to water. If a container plant is repeatedly drying out very quickly, repotting into a slower-draining container might be a good idea, too.
Learn More About the Underwatering more
close
plant poor
Yellow edges
Overview
Symptom
Causes
Treatment
Prevention
Active Period
What is Yellow edges Disease on Jerusalem spurge?
Yellow edges, a plant disease affecting Jerusalem spurge, manifests as yellowing along leaf margins, progressing to broader chlorosis. The disease impacts photosynthesis and general vitality, often leading to stunted growth and premature leaf drop.
Symptom Analysis
Symptom Analysis
In Jerusalem spurge, the primary manifestation includes yellowing at the margins of the leaves, ultimately affecting almost the entire leaf surface. This often correlates with reduced growth and vigor, leading to premature leaf senescence.
What Causes Yellow edges Disease on Jerusalem spurge?
1
Nutrient deficiency
Imbalances or lack of essential nutrients such as magnesium or iron can lead to yellowing of leaf edges.
2
Watering issues
Both underwatering and overwatering can contribute to stress, leading to yellow edges.
3
Environmental stress
Extreme temperatures, poor soil conditions, or inadequate light may exacerbate the condition.
How to Treat Yellow edges Disease on Jerusalem spurge?
1
Non pesticide
Proper fertilization: Apply balanced fertilizers that contain essential micronutrients to correct nutritional deficiencies.

Optimized watering: Maintain consistent moisture levels, avoiding both over and under-watering.
2
Pesticide
Foliar sprays: Use foliar sprays containing chelated forms of necessary micronutrients for quick absorption and symptom management.
Continue reading in our app - it's better
A database of 400000+ plants
unlimited guides at your fingertips...
close
Scars
plant poor
Scars
Any light-colored markings that appear on stems but which do not enlarge or multiply are simply scars that have healed.
Symptom Analysis
Symptom Analysis
Scars form when the plant repairs wounds. They can be the result of people or pets passing by and scraping the plant. Once the underlying issue is resolved, the plant will heal but a scar may remain.
Pests and pathogens can also cause scarring. Insects may attack the plant for a meal, resulting in extensive scarring when a few invaders turn into an infestation. Diseases such as fungus and bacteria can weaken the plant, causing brown spots, mushy areas, or blisters that lead to scars.
Scars occur on stems when a leaf or bud has been lost and the plant has healed. The harder tissue is like a scab that protects a wound.
On other occasions, scars can signal problems from environmental conditions, such as overexposure to sunlight or heat. It might surprise you to know that plants can suffer from sunburn, even desert dwellers like cactus!
Solutions
Solutions
Each source of scarring requires a different approach to help your plant recover.
  1. Protect the trunk and leaves from physical damage like scrapes.
  2. If pests or disease are the cause of scarring, isolate the plant from others to avoid further spread. Some pests can be removed with organic remedies such as a soft cloth and soapy water solution or diluted isopropyl alcohol spray.
  3. Stop sunburn by moving your plant away from direct sunlight and making sure it has the water it needs.
  4. Frequent leaf or bud loss may be due to insufficient light or nutrients.
Prevention
Prevention
Preventing some sources of scarring is easier than others, but all start with careful attention to your plants once you decide to bring them home.
  1. Review specific guidelines for your plant, including soil drainage, watering, and fertilizer requirements.
  2. Inspect plants before planting and use sterile pots and fresh potting soil or media to limit transfer of fungi or bacteria.
  3. Once established, check your plants regularly for signs of scarring or the presence of pests, as it is better to catch problems as early as possible.
Continue reading in our app - it's better
A database of 400000+ plants
unlimited guides at your fingertips...
close
Brown spot
plant poor
Brown spot
This infection can cause brown spots or patches to appear on the plant.
Overview
Overview
Discolored spots on the foliage of plants are one of the most common disease problems people observe. These spots are caused by fungal and bacterial diseases, with most infections related to a fungal pathogen.
Brown spot can occurs on all houseplants, flowering ornamentals, vegetable plants, and leaves of trees, bushes, and shrubs. No plants are resistant to it, and the problem is worse in warm, wet environments. It can occur at any point in the life stage as long as leaves are present.
Small brownish spots appear on the foliage and enlarge as the disease progresses. In severe cases, the plant or tree is weakened when the lesions interrupt photosynthesis or cause defoliation.
Symptom Analysis
Symptom Analysis
In most cases, brown spot only affects a small percentage of the whole plant, appearing on a small amount of the leaves. A small infection only puts minor stress on the plant. However, if left untreated and the disease progresses over numerous seasons, it will severely impact the health and productivity of the infected specimen.
  • Sporulation begins (reproduction of the fungal spores), and tiny spots appear on leaves.
  • Placement is often random and scattered as diseases are spread through raindrops.
  • May appear on lower leaves and the interior of the plant where humidity is higher.
  • Brown spots enlarge and grow large enough to touch neighboring spots to form a more prominent blotch.
  • Leaf margins may turn yellow.
  • Tiny black dots (fruiting bodies of the fungi) appear in the dead spots.
  • Blotches grow in size until the entire leaf is brown.
  • The leaf falls off the plant.
Severe Symptoms
  • Partial or complete premature defoliation
  • Reduced growth
  • Increased susceptibility to pests and other diseases
Disease Cause
Disease Cause
Brown spot, or leaf spot, is a common descriptive term given to several diseases affecting the leaves of plants and trees. Around 85% of diseases exhibiting leaf spots are due to fungus or fungus-like organisms. Sometimes brown spot is caused by a bacterial infection, or insect activity with similar symptoms.
When conditions are warm and the leaf surfaces are wet, fungal spores being transported by wind or rain land on the surface and cling to it. They do not rupture the cell walls but grow in the space between the plant plasma membrane and the plant cell wall. As the spores reproduce, they release toxins and enzymes that cause necrotic spots (i.e., dead tissue) on the leaves, allowing the fungi to consume the products released when the cells degrade.
Solutions
Solutions
In minor cases of brown spot, there isn’t any need to treat the disease. However, if much of the foliage is affected and defoliation occurs, the plant will benefit from getting rid of the infection. It is recommended to start by applying organic treatment options, working up to the more potent synthetic, chemical fungicides if necessary.
Organic options won’t kill the fungus, but will prevent it from spreading.
  1. Dissolve ½ teaspoon of baking soda and one teaspoon of liquid soap in a gallon of water. Using a spray bottle, spray on tops and bottoms of leaves until the mixture drips off. Repeat every two weeks until existing spots stop enlarging and new spots no longer appear.
  2. Spray a copper-based fungicidal soap on the leaves, coating the top and bottom leaf surfaces. Reapply as directed on the product label. Copper penetrates the leaf surface and prevents germination of spores so the fungus cannot spread.
  3. Apply an all-purpose fungicide to the entire plant, following the label instructions carefully.
Prevention
Prevention
Like many other diseases, it is easier to prevent brown spot than cure it, and this is done through cultural practices.
  • Clear fall leaves from the ground before winter to minimize places where fungi and bacteria can overwinter.
  • Maintain good air movement between plants through proper plant spacing.
  • Increase air circulation through the center of plants through pruning.
  • Thoroughly clean all pruning tools after working with diseased plants.
  • Never dispose of disease plant material in a compost pile.
  • Avoid overhead watering to keep moisture off of the foliage.
  • Keep plants healthy by providing adequate sunlight, water, and fertilizer.
Continue reading in our app - it's better
A database of 400000+ plants
unlimited guides at your fingertips...
close
Underwatering
plant poor
Underwatering
Leaves may wilt for a variety of reasons.
Overview
Overview
Underwatering plants is one of the quickest ways to kill them. This is something that most gardeners are well aware of. Unfortunately, knowing exactly how much water a plant needs can be tricky, especially considering that underwatering and overwatering present similar symptoms in plants.
Therefore, it’s important to be vigilant and attentive to each plants’ individual needs.
Symptom Analysis
Symptom Analysis
As mentioned earlier, overwatering and underwatering present similar symptoms in plants. These symptoms include poor growth, wilted leaves, defoliation, and brown leaf tips or margins. Ultimately, both underwatering and overwatering can lead to the death of a plant.
The easiest way to determine whether a plant has too much water or too little is to look at the leaves. If underwatering is the culprit, the leaves will look brown and crunchy, while if it’s overwatering, they will appear yellow or a pale green in color.
When this issue first begins, there may be no noticeable symptoms at all, particularly in hardy or drought-tolerant plants. However, they will begin to wilt once they start suffering from a lack of water. The edges of the plant’s leaves will become brown or curled. Soil pulling away from the edges of the planter is a telltale sign, or a crispy, brittle stem.
Prolonged underwatering can cause a plant’s growth to become stunted. The leaves might drop and the plant can be more susceptible to pest infestations, too.
Disease Cause
Disease Cause
Underwatering is caused by, quite simply, not watering plants often or deeply enough. There is a heightened risk of underwatering if any of these situations apply:
  • Extreme heat and dry weather (when growing outdoors)
  • Grow lights or indoor lighting that is too bright or intense for the type of plant
  • Using fast-draining growing media such as sand
Solutions
Solutions
The easiest (and most obvious) way to address underwatering is to fully hydrate the plant. However, this must be done carefully. A common mistake that many gardeners make is to douse their underwatered plants with water. This can overwhelm the roots of the plant and shock its system, something that can be even more damaging than the lack of water to begin with.
Instead, water thoroughly and slowly, taking breaks to let the water slowly saturate through the soil to get to the roots. Use room temperature water, as cold water might be too much of a shock.
In the future, shorten the time between waterings. A good rule of thumb is to check the soil around each plant daily. If it’s dry to at least two inches down, it’s time to water. If a container plant is repeatedly drying out very quickly, repotting into a slower-draining container might be a good idea, too.
Prevention
Prevention
Always check the soil before watering. If the top inch of soil feels moist, though not wet, the watering is perfect. If it’s dry, water it immediately. If it feels soggy, you avoid watering until it dries out a bit more.
Also, make sure the lighting is sufficient for the species. Plants grow faster and need more water when there is intense light or lots of heat. Being aware of these conditions and modifying them, if possible, is a good way to prevent underwatering. Many container plants are potted in soil mixtures mean to be well-draining. Adding materials that retain moisture, like compost or peat moss, can also prevent these symptoms.
Other tips to prevent underwatering include:
  • Choose pots with adequately-sized drainage holes
  • Avoid warm temperatures
  • Use large pots with additional soil (these take longer to dry out)
  • Avoid terracotta pots, which lose water quickly
Continue reading in our app - it's better
A database of 400000+ plants
unlimited guides at your fingertips...
distribution

Distribution of Jerusalem spurge

feedback
Feedback
feedback

Habitat of Jerusalem spurge

Mountains, rocky
Northern Hemisphere
South Hemisphere

Distribution Map of Jerusalem spurge

distribution map
Native
Cultivated
Invasive
Potentially invasive
Exotic
No species reported
product icon close
Your Ultimate Guide to Plants
Identify grow and nurture the better way!
product icon
17,000 local species +400,000 global species studied
product icon
Nearly 5 years of research
product icon
80+ scholars in botany and gardening
ad
product icon close
Continue reading in our app - it's better
A database of 400000+ plants
unlimited guides at your fingertips...
Cookie Management Tool
In addition to managing cookies through your browser or device, you can change your cookie settings below.
Necessary Cookies
Necessary cookies enable core functionality. The website cannot function properly without these cookies, and can only be disabled by changing your browser preferences.
Analytical Cookies
Analytical cookies help us to improve our application/website by collecting and reporting information on its usage.
Cookie Name Source Purpose Lifespan
_ga Google Analytics These cookies are set because of our use of Google Analytics. They are used to collect information about your use of our application/website. The cookies collect specific information, such as your IP address, data related to your device and other information about your use of the application/website. Please note that the data processing is essentially carried out by Google LLC and Google may use your data collected by the cookies for own purposes, e.g. profiling and will combine it with other data such as your Google Account. For more information about how Google processes your data and Google’s approach to privacy as well as implemented safeguards for your data, please see here. 1 Year
_pta PictureThis Analytics We use these cookies to collect information about how you use our site, monitor site performance, and improve our site performance, our services, and your experience. 1 Year
Cookie Name
_ga
Source
Google Analytics
Purpose
These cookies are set because of our use of Google Analytics. They are used to collect information about your use of our application/website. The cookies collect specific information, such as your IP address, data related to your device and other information about your use of the application/website. Please note that the data processing is essentially carried out by Google LLC and Google may use your data collected by the cookies for own purposes, e.g. profiling and will combine it with other data such as your Google Account. For more information about how Google processes your data and Google’s approach to privacy as well as implemented safeguards for your data, please see here.
Lifespan
1 Year

Cookie Name
_pta
Source
PictureThis Analytics
Purpose
We use these cookies to collect information about how you use our site, monitor site performance, and improve our site performance, our services, and your experience.
Lifespan
1 Year
Marketing Cookies
Marketing cookies are used by advertising companies to serve ads that are relevant to your interests.
Cookie Name Source Purpose Lifespan
_fbp Facebook Pixel A conversion pixel tracking that we use for retargeting campaigns. Learn more here. 1 Year
_adj Adjust This cookie provides mobile analytics and attribution services that enable us to measure and analyze the effectiveness of marketing campaigns, certain events and actions within the Application. Learn more here. 1 Year
Cookie Name
_fbp
Source
Facebook Pixel
Purpose
A conversion pixel tracking that we use for retargeting campaigns. Learn more here.
Lifespan
1 Year

Cookie Name
_adj
Source
Adjust
Purpose
This cookie provides mobile analytics and attribution services that enable us to measure and analyze the effectiveness of marketing campaigns, certain events and actions within the Application. Learn more here.
Lifespan
1 Year
picturethis icon
picturethis icon
Snap a photo for planting, toxicity, culture, and disease info, etc.
Use App
This page looks better in the app
Open